Producing a fundraising video for Kickstarter, Indiegogo, Fundable, or a promotional YouTube video for a business can be a fairly big investment. A startup founder will often pitch an idea speaking directly to the camera—this is known as a single-presenter video pitch or “talking head.” Unfortunately, not many people do it well.
It is said, “you never get a second chance to make a first impression.” A high-quality video pitch can go a long way toward helping your Kickstarter video campaign, business or individual gain credibility, secure funding and, in general, be taken seriously: A poor-quality video pitch could potentially be the end point for any promising idea or up and coming business right out of the gate.
(NOTE: When “camera” is mentioned, it means any device with the capacity to shoot video.)
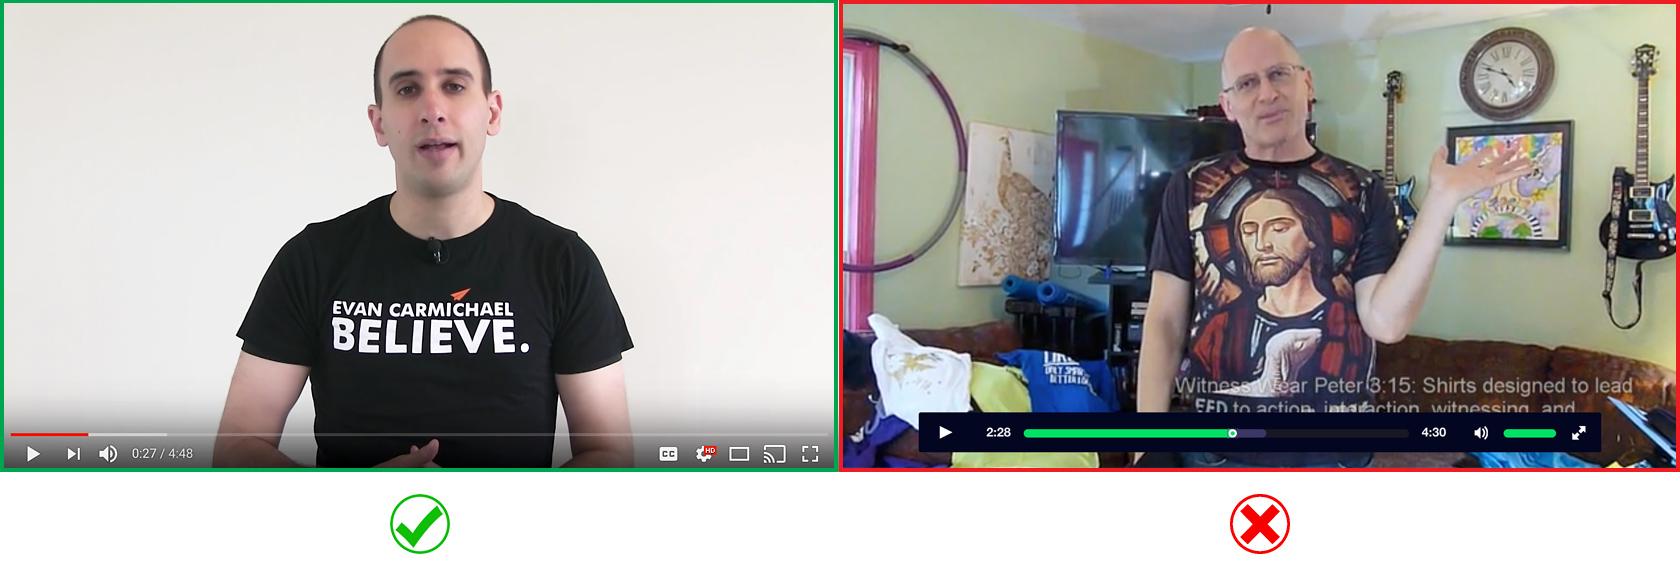
Kickstarter video production do’s and dont’s.A clean, well-composed, high-quality video will establish immediate credibility.
Tips to Produce the Perfect Video Pitch:
1. Choose Your Location Wisely
- Shoot inside a building in a room carefully selected for sound and lighting (more on these later). Try not to shoot anything outdoors: a porch, balcony, terrace, park, etc. Noise and sudden light changes will be a constant challenge.
- If possible, select a location with no mixed lighting sources, e.g., overhead fluorescent lamps or daylight coming in through a window that you can’t block out. (See the “Lighting Setup” section below for more.)
- Select a location with minimal ambient noise, e.g., noisy sound sources such as an appliance, people talking, or an open window with unavoidable outside noise.
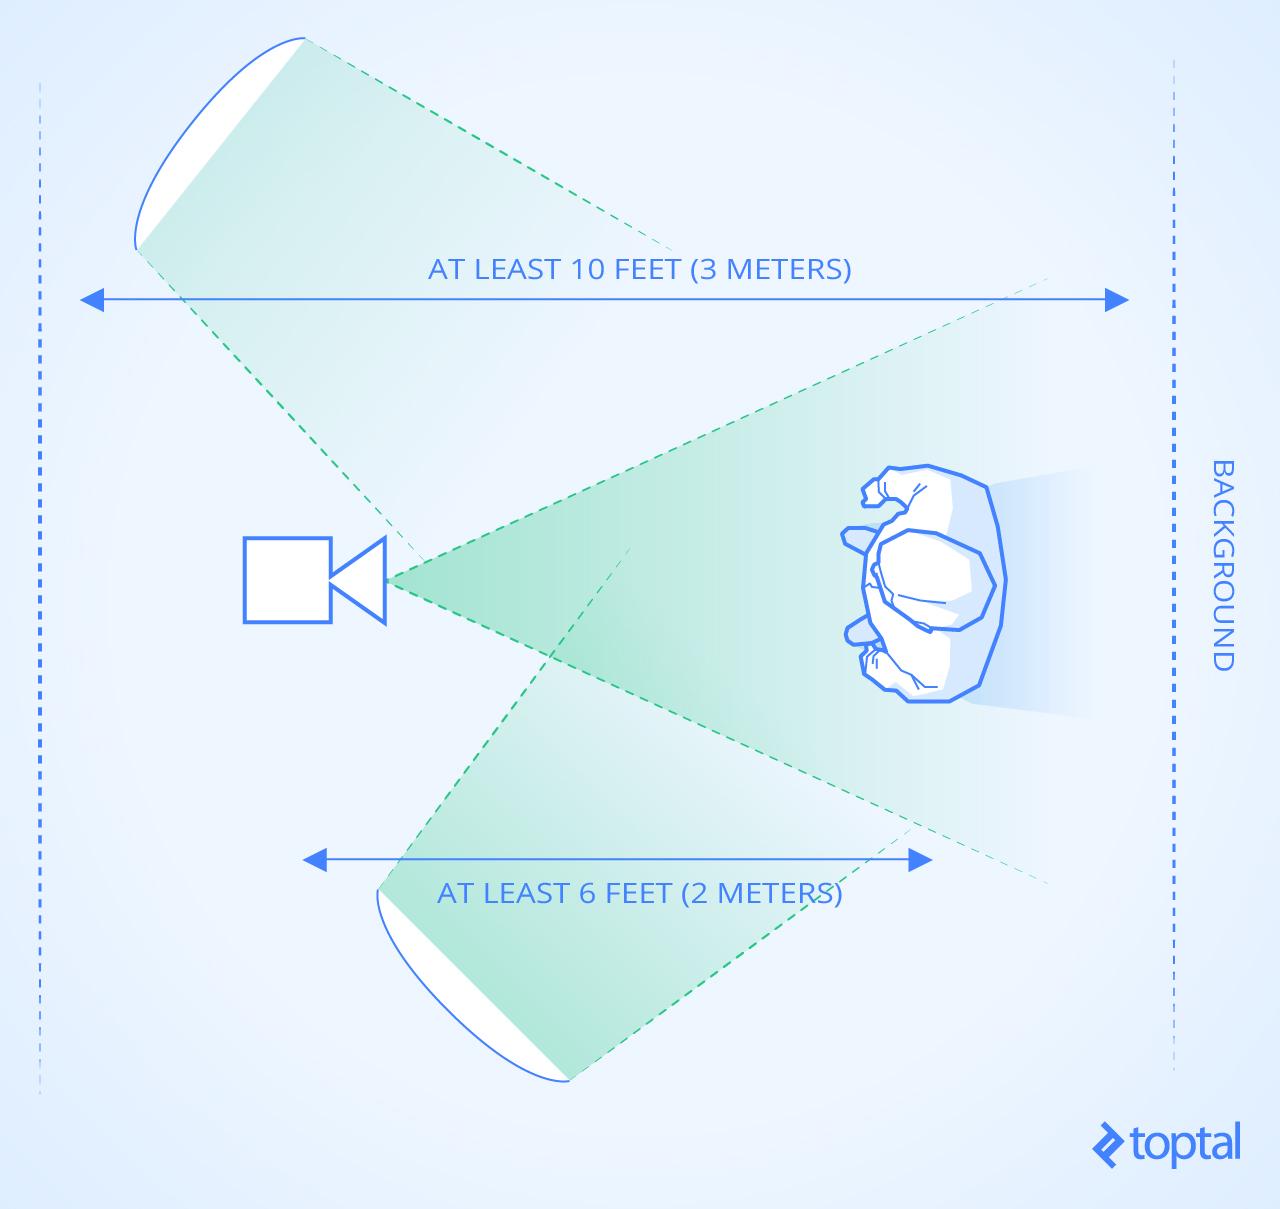
- Select a location with enough room for the presenter, lights, and camera. You will need at least 10 feet so as not to force uneven lighting, unwanted shadows, tight shots that cut off action—or the need to shoot with a wide-angle lens that will produce visual distortion.
- Pay attention to the background behind the presenter. Select somewhere with little or no patterns or other types of visual interference; a flat color wall is preferable to a bookshelf with books, pictures, or plants.
- There should be enough room so the presenter is separated from the background, i.e., not directly in front of a wall but at least two feet away. This will also help to minimize unattractive shadows being cast behind the presenter. (See the “Lighting Setup” section below for more.)
- Avoid empty rooms. Sound reverberates: A totally empty room will produce bad sound. Furniture and curtains help break up bouncing sound, so try to record in a furnished room.
2. Camera Setup – Presenter Placement – Composition
- Always use a tripod, especially if you are using a smartphone or tablet. Keep the shot steady (do not overuse zoom or pan).
- If using a DSLR or video camera, set it up with the correct “white balance.” In most camera menu settings, you can select “daylight” or “indoors.” There may be times when “auto” will do the trick: If the camera has an “auto” option, take a white piece of paper, have your presenter hold it up toward the camera, zoom in, and set the white balance. You will need to set white balance at every location.
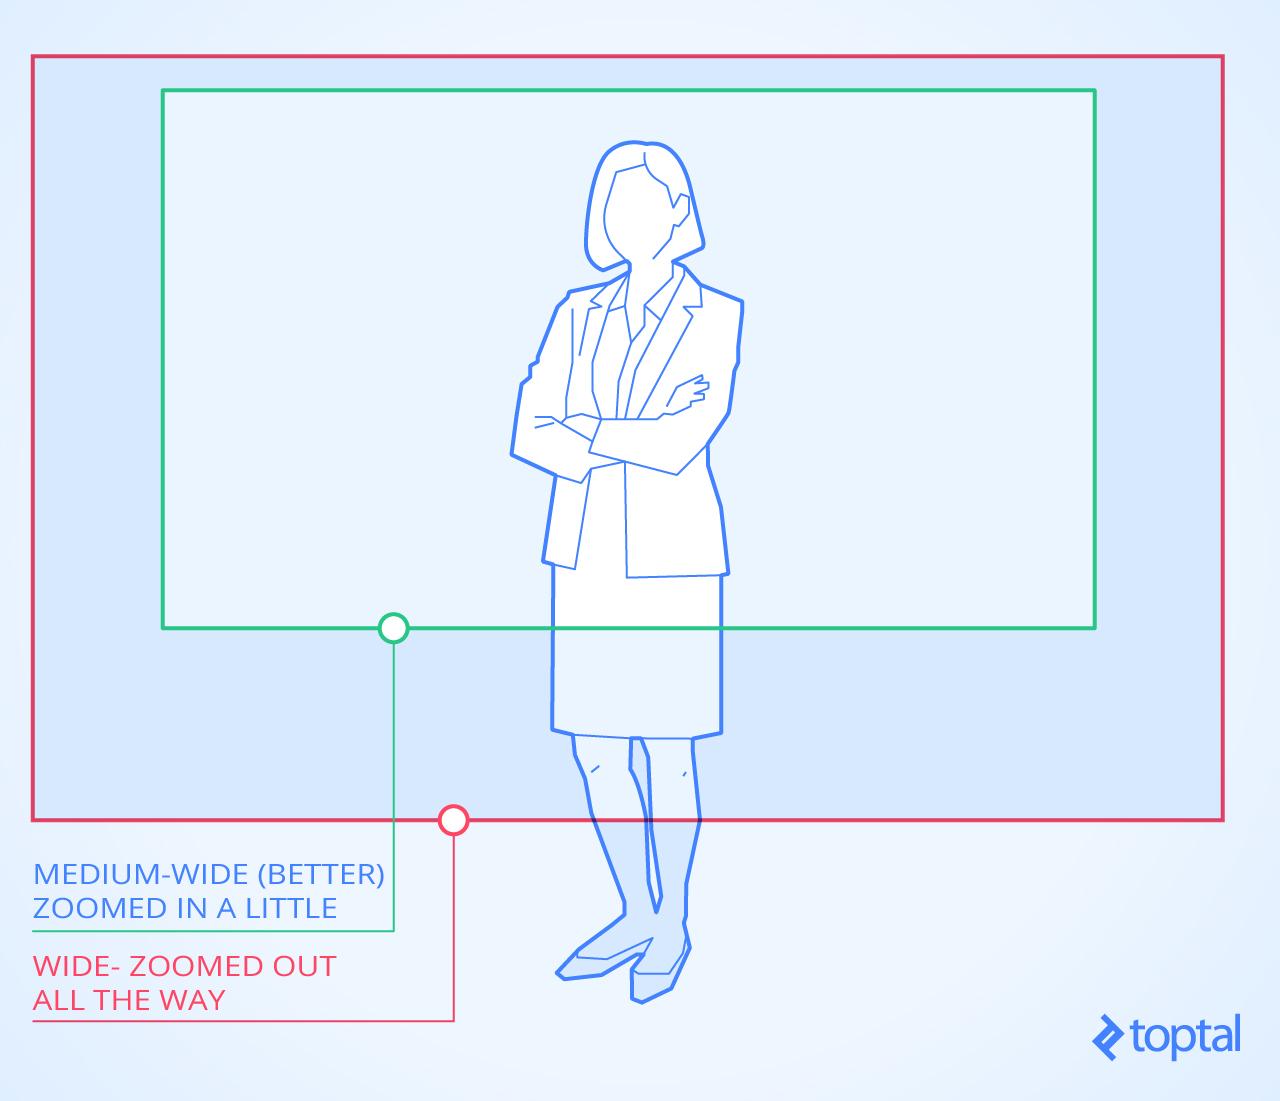
- Take a few steps back from the presenter and frame him/her slightly zoomed in. Framing the image this way will give you a more natural-looking composition. Try to avoid using the wide-angle on the lens (the default on all smartphone cameras) as it will produce visual distortion. Go all the way out to wide, zoom in slightly and THEN physically move the camera—either closer or further back from the presenter.
- Position the camera at the same height as your presenter. If standing, shoot from a natural eye-level—not from above, not from below. This will give your presenter a more natural look. Picture yourself talking to people—if they stand, you generally stand with them; if they sit, you sit down with them—doing this will put you at the same eye level, as if you were both the same height.

- Frame the shot with enough “headroom,” which is a few inches above someone’s head. Avoid leaving too much room above their head so it doesn’t look like the presenter is sinking into the bottom of the video.
- So the presenter isn’t reaching outside the frame, make sure to frame them leaving enough room for their arms and hands. This is especially important if they are demonstrating something.

- Avoid strong vertical lines behind the presenter (such as edges of paintings, pictures on the wall, etc.) as well as plants and other objects that may appear to be sticking out from the back of the their head.
- It’s best not to have everything in focus. You can achieve a nice, “cinematic” look by focusing the camera on the presenter, getting enough distance between them and the background, and making the background go out of focus.
- Watch the exposure. If your camera has a manual option, do not overexpose or burn out highlights. 99% of the time it’s best to use auto-exposure.
- What should the presenter wear? Avoid bright and saturated colors. The presenter should NOT wear white, red, or patterned clothing. Best to wear a single-color top (T-shirt, dress shirt, dress or jacket). Preferably pastel blue, grey, dark beige, or burgundy. No stripes. A solid color tie, not a patterned tie.
- Shoot pre-roll and post-roll with an extra 5 seconds before and after each shot. You will be very glad you did when it comes to editing.

3. Lighting Setup
- Position the presenter away from daylight coming in through a window, whether it’s behind them or to the side (out of shot). It’s very important to avoid having a window behind the presenter—it will be too bright and your presenter too dark. Remove any reflective objects from your frame: mirrors, shiny metals, glass, etc. Anything brighter than the person being recorded draws away the eye. It is a distraction and can potentially affect exposure and make the subject too dark. Small objects made of glass are OK.
- Do not mix lighting sources—daylight coming in through windows and interior light; overhead fluorescents and your own lighting. If you do have your own lighting, try to block out any daylight coming in through the windows or glass doors with shutters or drapes, and turn off overhead fluorescents. They all produce a different color when recorded to video—our eyes adjust automatically to mixed colors of light, but the camera does not. The optimal situation is to use your own lighting, as it will it give you 100% control.
- A well-lit shot is immediately pleasing to viewers. Use controlled lighting as best you can, or adjust what you’re filming when you can’t. Most of the composition (the frame) should be bright, with some shadows but not a lot of dark areas. Remember, you can always re-position the presenter.
- If no controllable lighting is available, find a bright, evenly lit indoor area, such as a spot opposite a large window with lots of diffused light—not direct sunlight. Be aware though, that lighting from the outside will change during the course of the day. Watch for shifting light conditions. If shooting in a situation like this, don’t shoot for more than 2 hours as it will create a problem later in editing. Remember not to mix lighting (such as daylight with overhead fluorescents) and to stay away from direct sunlight.

- You want most of your light to be lighting the front of what you’re filming—usually to one side and above rather than head on (think of how the sun lights things when it’s not midday). If the light’s behind what you’re filming (such as filming someone with a window behind them), or a light source in front of them (e.g., candles or table lamps at their own height), they’ll be too dark. Lighting used in the wrong position can cause shadows in unfortunate places (e.g., lighting that’s front on, directly above, directly beside, etc.).
- For good video, try using the basic “3-point lighting system.” Watch out for backlight shining into the camera lens, causing “glare.” Use the “barn doors” on the backlight to cut the light off the camera, or place an object between the backlight and the camera to block the light.

- Use soft lights for “key” and “fill” (see above) and a somewhat harder light for a “back” light. To make the lighting look natural, the lights should generally be two-to-three feet above the level of the presenter’s head and angled down towards the them.
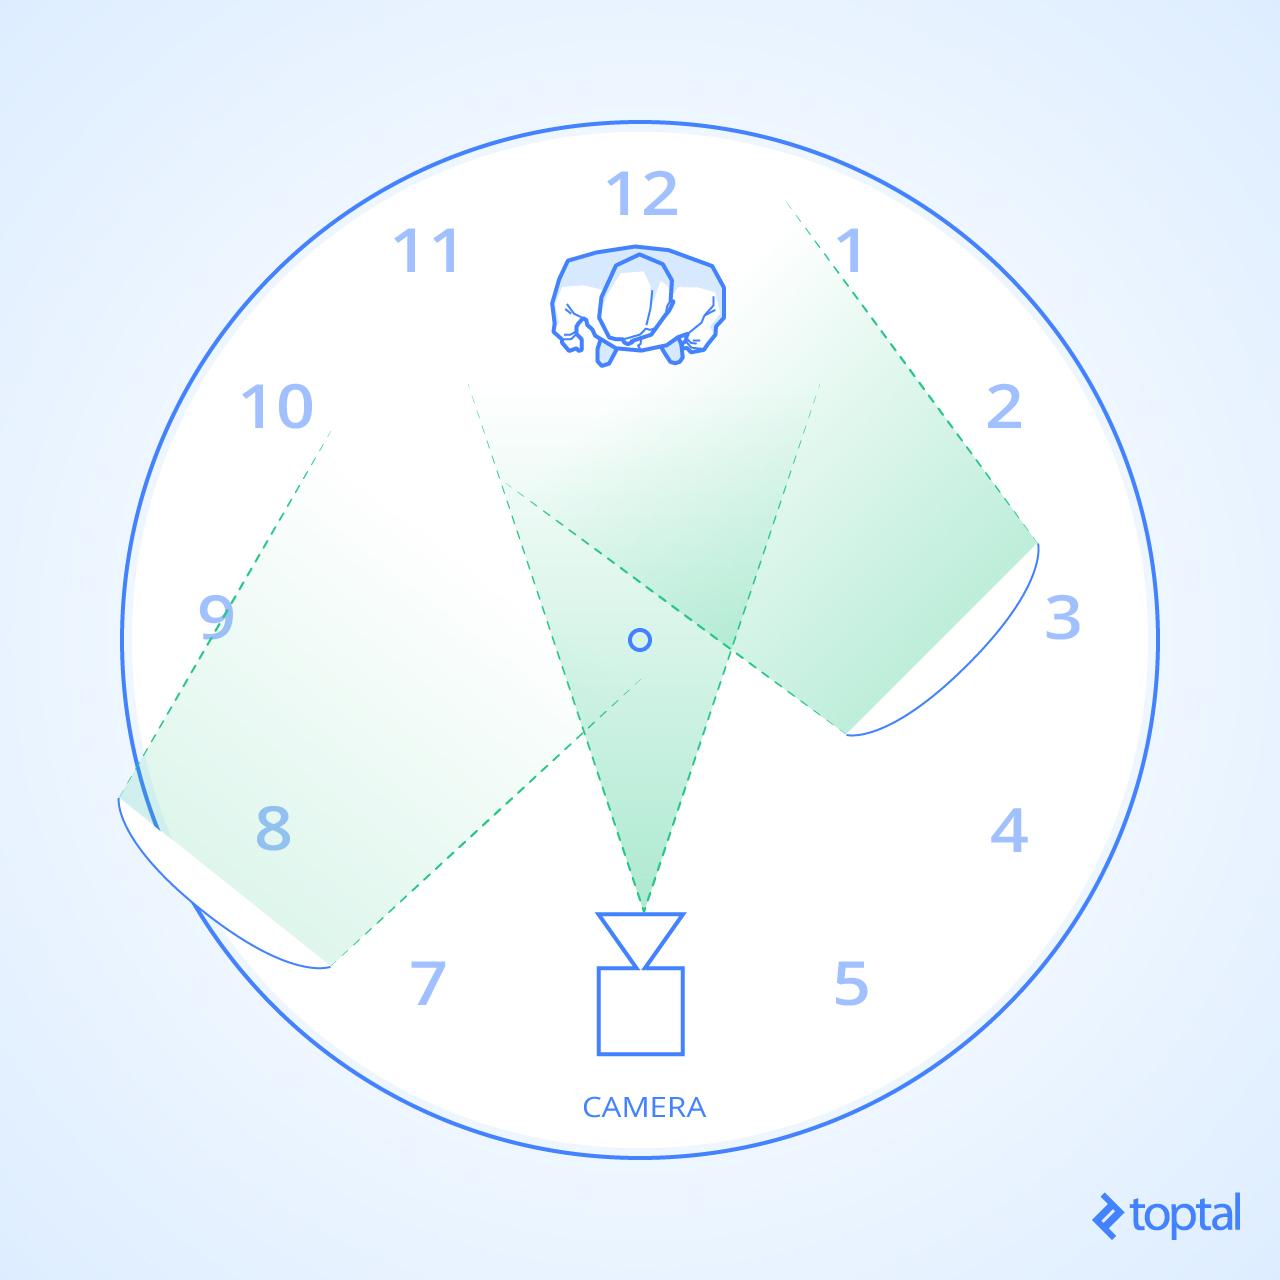
- Think of a clock face when placing lights. If the camera is at 6 and the presenter is at 12, the key light should be around 4 and the fill around 8. Remember, the key light is stronger than the fill so move the fill back a little if using identical lights, or use a light with less output for the fill.
- Be aware of the distance between your background/presenter/lights/camera. It’s all about balance. Don’t put lights too close to the presenter—it will make them too bright and the background too dark.
4. Sound Recording
- For clean sound, use a clip-on or lapel microphone (http://www.wisegeek.com/what-is-a-lapel-microphone.htm), or an external “shotgun” microphone placed close to the subject. Wear headphones to monitor what’s being recorded.
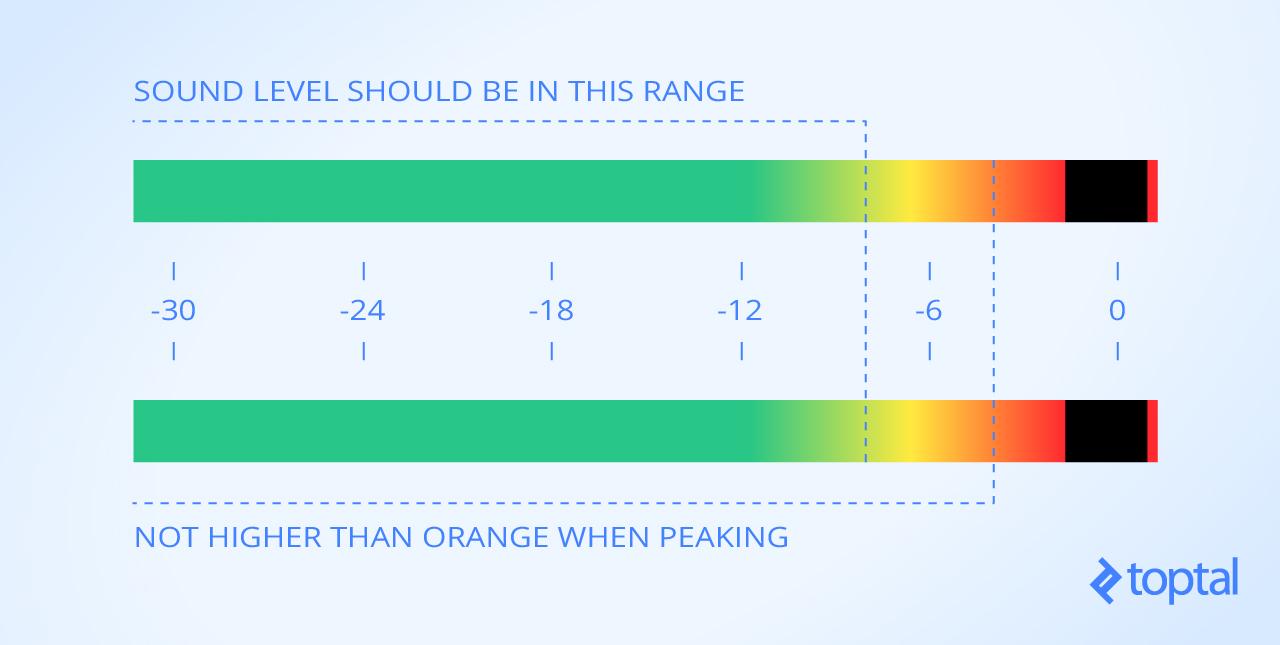
- It’s best to set up sound levels manually. Automatic sound levels can be erratic and magnify noises when the presenter is not speaking. Ask them to say a few words at their natural speaking level: People usually speak louder when they say “testing, testing 1-2-3” then drop the volume when they speak for the camera. While they’re speaking, set the volume control as high as you can without going into the “orange zone.” Best to keep it occasionally going into the “orange zone” but not any higher. Ideal recording levels are between -6 to -12 dB.
- Check the sound with headphones to make sure it’s being recorded properly. If there is no way to monitor the audio while recording, record a test and listen to it via headphones. If you can monitor live, you can hear what you’re actually recording and you’ll be able to tell if something goes wrong (the mike becoming unplugged, the presenter bumping it, batteries going flat, ambient noise interfering with the sound, distortion, etc.). You will waste a lot of production time if you find out later that the recording was terrible.
- It will distort the sound if the presenter starts to speak much louder than they were previously. It’s OK to stop recording, lower the recording level and ask the presenter to start again. You can amplify quieter dialog later during editing if necessary, but distorted sound can’t be fixed.
5. Shoot for Editing
- It’s usually best to film a scene using multiple shots, giving different perspectives to what’s being viewed (different angles, different magnifications, etc), but don’t overdo it. This approach will help greatly in editing. Use the zoom to bring objects at a distance closer to the lens, or to indicate size and perspective.
- Use two cameras if possible. Set up one as a wider shot and the other as a close-up/medium shot. It will make editing the material a breeze.
- To present the story, use a wide shot, also known as the “master shot” to show the room and the presenter; a medium shot to move in closer to the action; or a close-up to emphasize a product or show what the presenter’s hands are doing. There are times when lots of quick cuts help a scene, and there are times when a really lengthy shot makes the scene more natural to watch.
- If using a single camera and the recording has to be stopped due to a mistake, or if for some reason there is need for a break, change the shot by zooming in or out (for example, from a wide to a medium shot and vice versa) so that when the presenter continues you can seamlessly cut the two shots together in editing.
6. Editing
- Editing means choosing and putting together only the shots you need. You should remove anything that doesn’t belong—mistakes, lots of waiting around for something to happen, boring pauses between things, etc.—and take out anything that is simply pointless.
- Preview your raw footage to familiarize yourself with everything you have shot.
- Log your takes as you watch. Keep a piece of paper handy and write a brief description of everything you shot—preferably with a timestamp (where it is on the timeline) so you can find it more easily later.
- It will make it more interesting if you edit with a good mix of wide/medium/close-up shots.
- Search the web for “video editing tips” to get advice on how to edit professional videos.
7. Encoding for the Web
- Bad source material (shaky camera; background noise) makes for bad compression. Motion or lots of cuts also result in bad compression. A well-lit recording (bright with not too many shadows) along with a steady image and not too much detail in the background (a flat-colored wall) compresses the best and produces the best looking video for the web.
- For encoding your video, choose a bitrate (bits per second which is the volume of data as it streams) keeping both the dimensions (480p, 720p, 1080p) and quality of the output file in mind. Whenever possible, use two-pass encoding; it will take longer to encode, but the file will look better. There’s a guide on YouTube and a “compression tutorial” on Vimeo for encoding video for the web.
- For audio, bit rates from 96 kbps to 128 kbps are usually fine. Stereo is often not necessary—you can use mono and cut the audio size in half. Test a few different bit rates to see if the sound loses any crispness.
- Here’s a link to a list of the “The Best Video Editing Software” for the most popular and highest rated editing and encoding software.
A Quick Checklist before Shooting
- Location selection for 1. space, 2. lighting, and 3. sound
- Battery check (plug into a power source if possible)
- White balance (if necessary)
- Sound check: Check levels and check sound through headphones
- Light check: Watch for shadows and burning highlights
- Storage card check (make sure to have enough capacity)
- Time/date stamp off (don’t want to record time and date over the image)
- Image stabilization on (if the camera has it)
- Image composition
- Focus
- Lock-down
- Allow the presenter to prepare and gather their thoughts…
- Shoot!
This article was written by Miklos Philips. Originally published on Toptal.